LIBERTY OF LONDON DRESS PROJECT #2

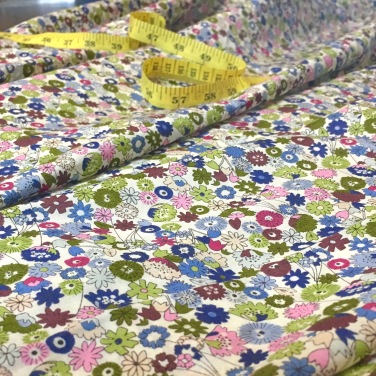
Now that I got some basic sewing techniques under my belt (that is, after I made a shift dress, skirt and top)I decided that it was time to get into a more challenging project. I have some Liberty of London fabrics from the summer sale that I had originally planned to make into vintage style dresses. 

50-60sStyle
50-60sStyleb

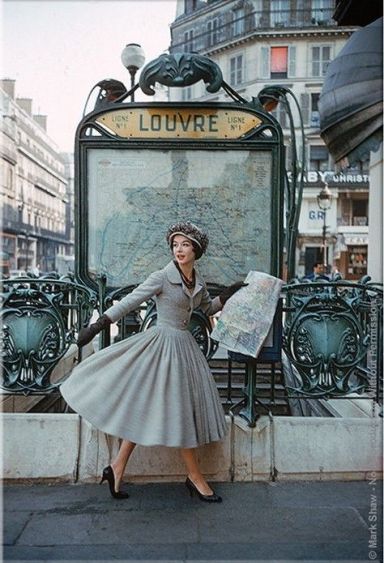
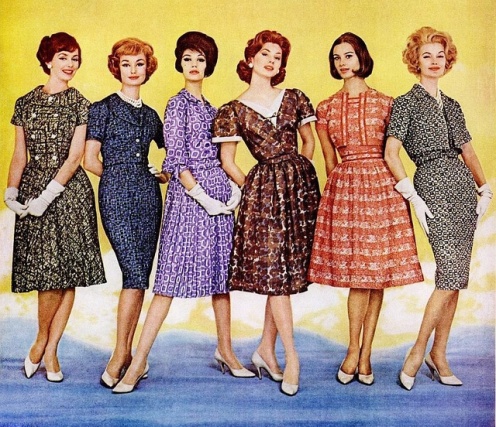
I love shirt dresses; got six of them and Adiben recently gifted me with a new one from her recent trip to the Philippines. If I had to choose a favourite era, it would be the 50s and the 60s. I love the long and slender shapes, the tiny waist and full skirts, the hats and gloves, etc. — more conservative and certainly more classic in style and design. But I must say that the bright colours, the ‘Mary Quant London look’ of the 60s isn’t my favourite.

60sFashion
50-60sStyle3

When I visited the V&A Museum ‘History of Fashion Gallery’ on my first trip to London, I learned that London, not Paris, became the center of the fashion world for the first time in the early 19th Century, and that the influence of the British in worldwide fashion didn’t begin nor did it stop with The Beatles. Apparently, with the worldwide fame of The Beatles, British influence swept into all parts of life, especially clothing and music.

Now, on to the sewing project!

LibertyofLondonShirtDressProject2_11 (1)
LibertyofLondonShirtDressProject2_10 (1)

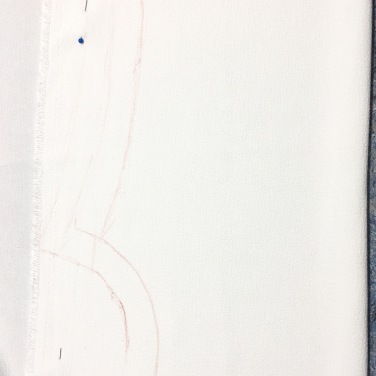
I made a pattern on my own for the first time — a shirt dress that I’d like but I wasn’t too sure if I did it right. So I went to my mentor once again, and because Tita Mely already taught me how to use a pattern as a guide to cut the fabrics, this time, she showed me how to do it straight into the fabrics using only the body measurement.

LibertyofLondonShirtDressProject2_12 (1)
LibertyofLondonDressProject2_1 (1)

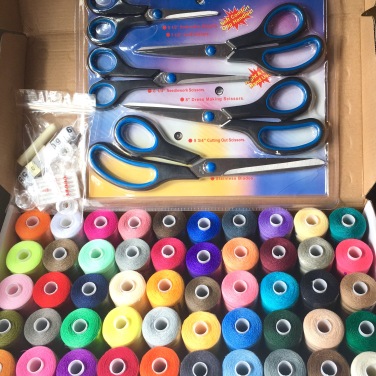
She’s been sewing for over 30 years and it was amazing to watch her do all of that.  Two meters is enough for the 3/4 sleeves shirt dress.

LibertyofLondonShirtDressProject2_9 (1)
LibertyofLondonShirtDressProject2_8 (1)

After a couple of hours tutorial, I came home with a fabric that’s been cut according to my specifications and complete with the interfacing, markings, etc.

LibertyofLondonShirtDressProject2_2 (1)

And because I forgot to tell Tita Mely that I wanted two secret pocket on my dress, I had to do it on my own. I just measured the palm of my hands and added 2-3 inches allowance then attached it to the fabric.

LibertyofLondonShirtDressProject2_7 (1)

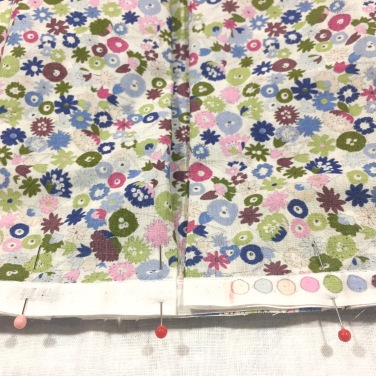
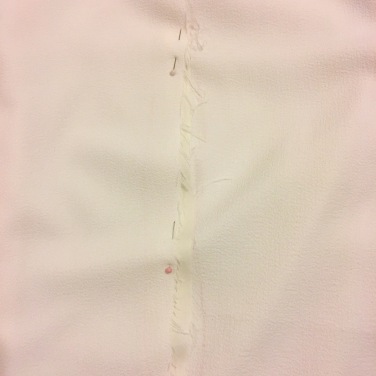
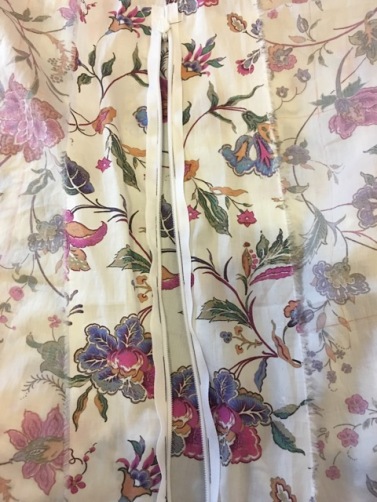
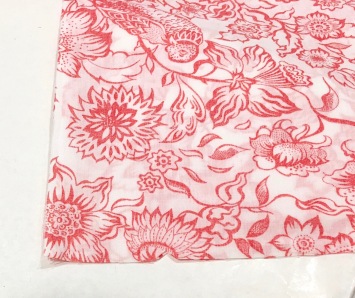
Connecting the arm hole and sleeves together was the most challenging task I have so far encountered in sewing. I had to redo it 3x! As you can see in the photo above, it’s not a pretty sight with needle marks on the delicate fabric.  Liberty of London Tana Cotton Lawn fabric is the finest cotton available in the market with a silk like texture so, it’s fragile and requires careful sewing. Thankfully, I didn’t damage the fabric and was able to perfectly attach the sleeves after the third attempt. 

LibertyofLondonShirtDressProject2_4 (1)
LibertyofLondonDressProject2_1 (1)

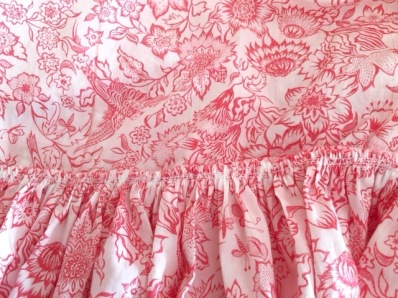
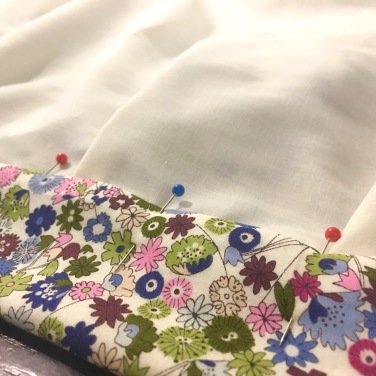
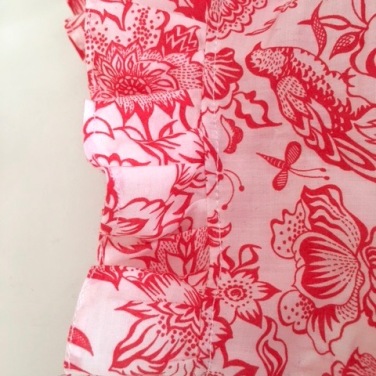
Tita Mely had given me some instructions on how to do the shirring of the skirt and how to attach it to the top, which I gleefully did without a hitch. For the sleeves, I forgot to ask her about the ruffles I wanted to add and decided to do it on my own without her advice. Because there wasn’t enough fabric to double it up, I wasn’t very happy about it.

LibertyofLondonShirtDressProject2_3 (1)
IMG_5398

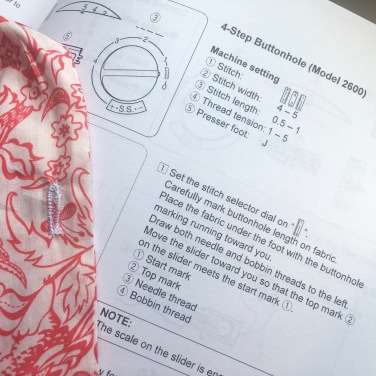
The last work was sewing the buttons and button holes. Since I never made a button hole in my life I had to refer to the Sewing Machine Manual on how to do it. It’s straight forward but takes time to master. I practiced it 3x on a piece of cloth before I finally did it on the dress. I found some buttons at a Haberdashery in Notting Hill that perfectly matched with the fabric albeit rather costly.

LibertyofLondonShirtDressProject2_6 (1)
LibertyofLondonShirtDressProject2_5 (1)

It took me two hours for five days to finish sewing the dress. And it turned out beautiful, if I may say so myself.  This is exactly why I sew — start with a fabric that I love, and I enjoy the creative process of making the pattern, picturing what I want to make, sewing it, and then turn it into reality.

LibertyofLondonDress_2
Version 2

It is a summer dress; it’s already autumn here but I decided to wear it to church for the first time last week. Jared took some photos of myself — not very good but these are the only photos I got with the new dress on. By the way, I had a petticoat worn over a slip (plus a black and white photo) to complete the 50s look.  Although I love dresses and skirts, and only wear jeans/trousers in the autumn and winter months, trousers are definitely on my ‘project list’ over the next few months.

LEARNING MODERN CALLIGRAPHY

Undeniably inspired by the sewing lesson I had three months ago, I’ve been on fire to learn another new skill. So, I recently got into modern calligraphy. That’s something I’ve been wanting to do in the last couple of years but just never got around to actually doing it. But before I’m quite there, let me just say that I like to learn something new each day, and it is a lifelong aspiration. It could be as simple as memorising a new ‘big word’ I come across with in my daily reading, or it could be a more complex activity involving skill in making things by handwork like sewing. I do it not just to gain an intellectual knowledge and a new skill to do a craft, but also to unwind. 

When I was in graduate school I took lessons on brush calligraphy, ikebana (flower arrangement), and tea ceremony. And before I got married I also did try my hand at many things — golf, all types of water sports, etc. — to find a new hobby. And one thing I tried that I absolutely enjoyed was pottery making — thanks to a friend who got me into her favourite pastime. It’s a wonderful recreation to get into. Very relaxing and therapeutic. Regrettably, I didn’t pursue it when I moved to the UK. Not only because I didn’t find a place to do it in central London, but it’s also a very costly and time consuming hobby. I might take up pottery making again in the near future.

ModernCalligraphyLucyEdmonds
ModernCalligraphyBook

Being left-handed, I imagined learning modern calligraphy would be a little bit challenging because I always tend to write in small letters.

Elna'sLavenderSachets
This is my handwriting when I’m not in a rush — not very good but readable. 

I’ve done Japanese calligraphy before, and thought using a brush is fairly easy than using a dip pen. I was a little bit hesitant about doing modern calligraphy although it’s been on my ‘must try’ list for a couple of years.

Rhoda'sCalligraphy
Image: screenshot from Rhoda’s Instagram account

It was my friend Rhodawho inspired me to finally do it. When she posted some photos on Instagram, I immediately contacted Lucy to find out if she has a modern calligraphy beginner’s class coming up in west London. I already got Lucy’s book for my birthday but never even finished reading it until I saw Rhoda’s Instagram post.

ModernCalligraphyWorkshop3

After I made the booking in June, I told my friend Joy about it and she was thrilled to do the calligraphy lesson with me. (Joy is a church mate of mine, and just like Rhoda, she is an incredibly talented lady). Thankfully, she was able to reserve a seat on the same class I signed up for.

ModernCalligraphyPracticeWorkshop
ModernCalligraphyWS_Joy

So glad Joy and I were able to do it together, it was so much fun doing it with a friend.

JapaneseCalligraphy
That’s my ‘young-self’ many moons ago doing Japanese brush calligraphy on a piece of lacquerware. 

I find modern calligraphy arduous, at least in the beginning. It is learning a new style of writing and I had to condition my mind to forget about my own handwriting. Just trying to write massive letters to practice A-Z was quite a challenge for me. But I went home after the workshop quite happy that I learned a series of techniques that will allow me to continue doing it on my own, and at the same time determined to practice it religiously and get better at it.

ModernCalligraphyLesson

Lucy was very sweet and quite helpful in giving clear instructions on how to do it from scratch — putting the nibs on the dip pen, holding the pen properly, and so on and so forth. She went around and took the time to teach one of us, there was a dozen of us, and she practically did the best she can in such a short period of time, just two hours. I felt that it wasn’t enough and I plan on attending more of Lucy’s calligraphy classes.

ModernCalligraphyPractice2

On the first week I devoted half an hour to forty five minutes practicing the alphabets just about everyday. The second week was quite hectic; I didn’t get to practice except for an hour and I felt terribly bad about it.

ModernCalligraphyPractice1

On the third week I promised myself not to neglect my calligraphy practice and I just got on with it every opportunity I had. However, I got tired of writing A-Z and decided to write words like the attributes of God and then moved into scribbling full scripture verses. The repetitive task of writing the scripture verses can be meditative and I’m thoroughly enjoying it.

Elna'sModernCalligraphy.4
Elna'sModernCalligraphy.1

Despite my busy schedule, I have been able to practice religiously for 45 minutes everyday, except Sunday, in the last couple of weeks.

ModernCalligraphy_VictorianQuillPen

This week I started writing proverbs by using an antique mahogany dip pen. Although it doesn’t work like a new pen I still enjoy using it.

Elna'sModernCalligraphy

 I am in the process of learning different calligraphy fonts and formats trying to come up with a personal style that I can hopefully develop. The goal is not to necessarily master modern calligraphy, but rather to continue expressing myself through this medium. I’ve always been fascinated by Calligraphy, particularly the Gothic and Medieval script. It is something I wanted to explore in the future but for now, I’ll focus on modern calligraphy. It’s been a month now since I attended Lucy’s class and I am making some progress albeit rather slow. I find it so relaxing and therapeutic, and I’m determined to continue doing it.

ModernCalligraphyPractice

Soon there will be another post about my Victorian laptop.  That is, the portable writing box that was popular in the Georgian and Victorian era.

A TALE OF SEWING A MAXI SKIRT AND A TRIP TO MAYFIELD LAVENDER FARM (1ST OF 2 PARTS)

A few weeks ago I shared a little story how I got into sewing and the reasons for learning a new skill. After I finished my first handmade shift dress, I ventured out into a new project — a pleated maxi ball skirt and a cropped top. I found this tutorial for a skirt that doesn’t require a pattern and the instructions are pretty straightforward and easy to follow. For the cropped top, I couldn’t find any tutorial and just decided to use the pattern I made with Tita Mely

MaxiSkirtmadebyElna10
MaxiSkirtmadebyElna
MaxiSkirtmadebyElna5
MaxiSkirtmadebyElna6
MaxiSkirtmadebyElna9
MaxiSkirtmadebyElna7
MaxiSkirtmadebyElna3
MaxiSkirtmadebyElna8

I had fun making the skirt and it made me feel like I could easily create even the more complicated skirt.

CroppedTopMaking6
CroppedTopMaking5
CroppedTopMaking4
CroppedTopMaking3

Sewing the top was a different story altogether. It was a little bit complicated to make, at least for the first time. The fitting wasn’t right when I tried it on and it took me 2-3 hours a day for about 5 days to finally get it right. The arm hole was the most challenging part to sew and I had to work on it at least five times to make it perfect, partly because it has a lining and I wanted a perfect fit. It was purely experimental — trial and error and yes, it was a huge success if I may say so myself.  Definitely learned a lot and will apply the little skills I learned the next time I sew a sleeveless blouse.

CroppedTopMaking
CroppedTopMaking1
CroppedTopMaking2

Top photos show some of the mistakes I made — invisible zipper sticking out, twisted fabrics, etc. It was a bit frustrating having to redo the arm hole a few times and I thought about getting Tita Mely to continue the work but decided not to. I started the project and was determined to finish it. And I am so glad I did because in the end, I am happy with the result. The skirt is made of cotton and the top is of poly cotton; both with a cotton lining so it is not see through.  Photos below show the evidence of my hard work. It’s a rather simple maxi skirt and top but putting them on made me feel like a million dollars haha!

MaxiSkirtCroppedTopbyElna1

Unpretentiously, I was happy to model my own creation.  This maxi skirt is my new favourite; it’s a classic, always in fashion skirt. It fits my size perfectly and the abundance of fabric makes a beautiful flow as I walk, or rather, frolic around the lavender field. 

LavenderField
Love this pic that Jared took of myself. 

The next post will be about the ‘maxi skirt project’ with our teenage girls at church and our trip to the lavender field.

Note: Here’s the link to the 2nd Part.

LEARNING A NEW SKILL

So I have finally started learning how to sew! When I told an old friend of mine back in Manila that I was in the process of sewing a dress, she told me it’s pretty ambitious to do a shift dress for a first sewing project, and that I should have started with a pillow case or a placemat. I reasoned out and told her, “But it would be very easy sewing a pillow case or a placemat.” 

Anyway, I’m doing this for a few reasons, and here’s why I am doing it:

  • Because I wanted to learn how to make my own clothes. Learning a new skill is really important to feeling enthusiastic about being creative even if it means trying and failing. (And I am not very creative so this is a big challenge.)
  • Because I thought it would be a lot of fun. I like buying fabrics and I especially love Liberty London fabrics. I also convinced myself that I could make my own clothes; that I could create something, but just the act of taking my body measurement out on a piece of paper then make a pattern and cut the fabric sounded fun — seems like a delightful release from the seriousness of my work.
  • Because I simply want to challenge myself and prove to myself that I can do it. The challenge of a task that I consider really big is quite exciting.

So yes, dressmaking it is that I have added into my list of hobby!  But the truth is I’ve been here before — many moons ago. In high school I had a Dressmaking/Tailoring class — it was part of the secondary school curriculum back in the Philippines. All the girls in my class were taught how to make a pattern for a set of pajama; I actually made one for myself and wore it until it did no longer fit me. Regrettably, I did not develop any of those practical skills I have learned in high school (I was more interested in scholarly pursuits), but I do have great memories about my Dressmaking/Tailoring teachers, Miss Monica and Mrs. Avila. Both ladies were very gentle and soft-spoken, and I absolutely adored them.

Anyway, three months ago I was chatting with one of my church mates, Melita, and she informed me that her mother (who is a dressmaker in the Philippines) was coming to London and stay with her for five months to help out with the kids. Melita heard me say a few times before that I wanted to learn sewing so she kindly offered me to come over to their flat and take lessons from her mother. I thought it was a brilliant idea. So I spoke with her mother about it as soon as she arrived in the country and she happily agreed to teach me but it took me a month or two before I could finally come over to their place to finally do it. I must mention that Tita Mely is a very gentle and soft-spoken lady who reminded me so much of my dressmaking/tailoring teachers back in high school.

I showed up at their flat one morning with some fabrics, pattern drafting paper, tape measure, and other sewing accessories, and Tita Mely (pictures above) very patiently taught me how to take my body measurement, how to make a pattern for a dress, skirt, top and trousers, and even showed me how to cut the fabric. It took two and a half hours to do all of that. Thankfully, Ken Zion, Tita Mely’s grandson, slept the whole time and there was no interruption.

Sewing_2
Sewing_9
elna-37-1

After that crash course, I had a fabric ready for sewing and it took another 2-3 weeks before the sewing machine I ordered online was finally delivered. I originally wanted a brand named Robert but it was out of stock and was told I have to wait until mid-summer for a new stock to arrive. Incidentally, I found this sewing machine brand named after myself  Elna (or was I named after it? haha), and it was on sale and came with special offer such as free extended guarantee for 5 years, 50 pieces of threads, 5 scissors, 5 bobbins, and many other sewing accessories. When I checked it online and found out it’s good enough for me, I went ahead and ordered it. (BTW, I’ve only heard about this brand 3 months ago while searching for a new sewing machine to buy, and I got mine from Sewing Machine Direct and received an excellent service.) And as soon as it was delivered I played around with it; learned how to load the bobbin, the 20 Stitch selection, etc.

Sewing_10
Sewing_01

The next day I talked to Tita Mely and asked her where to start — she explained that I need to cut the interfacing from the leftover fabrics and start sewing them together, then the arm hole, and so on and so forth. I thought it was a bit daunting that she won’t be around when I finally do it. And by the way, she is taking care of her 10 month-old grandson when her daughter goes to work (Melita is a physical therapist and works at a hospital in north London), so it would be too much for me to carry my 6-7 kilos sewing machine to their place or to ask her to come over and take me through the whole sewing process.

Sewing_02
Sewing_03

So I took her instructions and also referred to the Sewing book that Phebe, another lady at our church, gave me. As soon as I started sewing to connect the interfacing, the fabric got stuck, the needle was twisted and I had to do it all over again.

Sewing_7
Sewing_5

After sewing the arm hole, sides, etc., it was time to put the zipper on. I hand stitched it rather than use pins, then after sewing it I found out that the zipper wasn’t concealed as it should be. I obviously didn’t do it right. After reading the sewing machine manual I was reminded that there’s a little device called ‘Zipper Foot’ I need to use for sewing the concealed zipper. Anyway, the Seam Ripper came in very handy and I spent a good 15-20 minutes taking the stitches off before I could finally fix it.

Sewing_8
Sewing_4

The last thing I worked on was the hem of the dress — the easiest bit — started sewing the one end of the slit (top left photo) to the other end to finish it off. I devoted 2 hours each day for 4 days sewing this dress, and that was the end of my first dressmaking journey.

LibertyPrintDress1
Here am I traipsing around the streets of Notting Hill with the very first dress I made! Jared and I actually took a little walk around the neighbourhood on the same afternoon I finished sewing just so he could take some pictures of myself. 

The dress is made of one meter Liberty Cotton Tana Lawn fabric (which I bought for only £9 — regular price is £22.50), and it was good enough to make this simple shift dress. When I brought Tita Mely and Melita to Liberty department store to show them the fabrics department (I love going there just to admire their massive collection), they were on sale and we were able to buy some at a bargain price. I love the pink and purple flower print on my new dress and couldn’t be any happier with my first project.

LibertyFabrics2017

I got all these five other Liberty fabrics and plan on making a maxi ball skirt, a top, and more dresses. Can’t wait!

TitaMely&I
With my mentor at Liberty department store after we shopped for fabrics over a month ago. Thanks Tita Mely for the sewing lesson! 

CRAFTING ONCE AGAIN

Haven’t done much crafting for ages but thanks to a very special lady who recently rekindled my desire for new creative pursuits. I am not very crafty myself but I used to do a lot of Scrapbooking on weekends even after I got married but haven’t done it for years. After our trip to Shetland last month I mentioned Rhoda in my blog; I’ve never heard of Stampin’Up! before but on the same day I’ve meet Rhoda and added her on Instagram and Facebook, I found out about her creative outlet; how she turned her hobby into a business and how she became a pioneer Stampin’Up! Demonstrator in the UK that enables her to travel around the country and some other European cities to teach crafting.

Stampin'Up2017_Accs

A couple of weeks after we returned from Shetland, Rhoda surprised me with a parcel that consists of Annual Catalogue 2017-18, Kit Card Soft Sayings, Stampin’ Scrub, Stampin’ Mist, Classic Stampin’ Pad Berry Burst, Glue Pen Fine-Tip and Scissors Paper Snips — a really beautiful Stampin’Up! kit that got me very enthusiastic about trying my hands on crafting once again.

Stampin'Up2017:18Catalogue

The new catalogue gives you a lot of ideas on what you can do and while browsing through this book I realised that even those who are not into arts and crafts will be convinced that they can be creative.

Stampin'Up2017Accs1

Last week I finally got to continue playing with the kit and accomplished something. I finished working on one card and enjoyed it from beginning to end. 

Stampin'Up2017_GiftfrRhoda

It’s actually very easy and so much fun to do. Everything is provided in the kit and there’s loads of ideas on the catalogue or you can come up with anything you fancy. The last thing I did after stamping the word ‘To my dear friend’ on a piece of paper was to cut it out and used a Sharpie permanent marker on the border and then pasted it on top of the card.

Stampin'Up2017_Card1
Stampin'Up2017_Card1_

I convinced myself after working on this card that I can certainly make more from now on and do no longer have to buy any cards.  If I only have the time, I’d love to do this on a daily basis as it’s a fantastic outlet to get my mind off from the hustle and bustle of London life but because there’s so much going on, I’d devote at least two hours 2-3x a week to do this.

Rhoda’s Instagram account has been a source of inspiration and I always look forward to her new post everyday. Anyone interested in crafting, please check her website Quick&EasyCrafter and try Stampin’Up! — it is very exciting, so much fun and a wonderful hobby to get into.